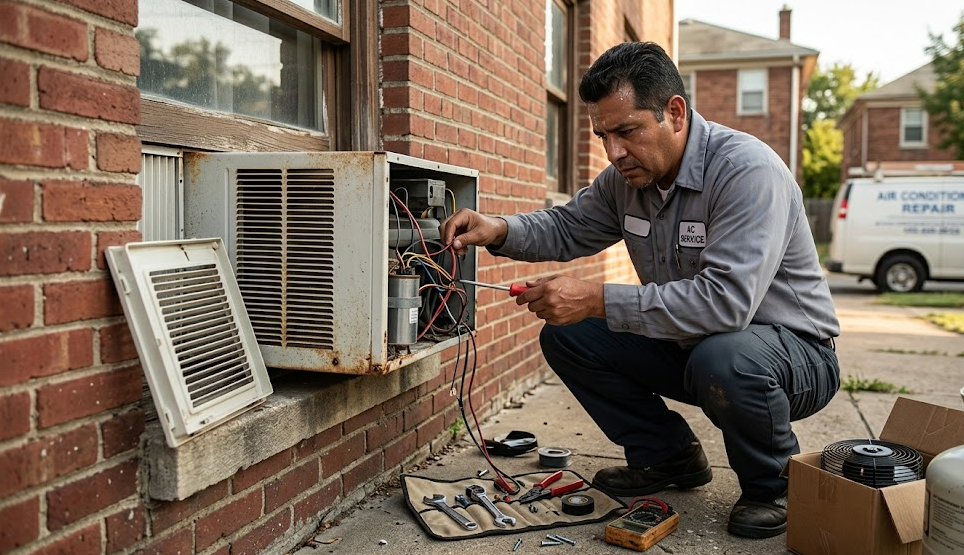
A flat tire never happens at a convenient time. It usually shows up when you are commuting, traveling, running late, or driving in poor weather. That is exactly why learning how to change a tire is one of the most practical vehicle skills a driver can have. It saves time, reduces stress, and helps you stay safer when roadside help is delayed or unavailable.
This guide explains how to change a tire on a car, how to change a tire step by step, and what to do in special situations like changing a tire on a truck, bike, or rim. It also covers what happens when you do not have a jack, how tire pressure sensors and valve stems fit into the process, and when changing a tire yourself is not the smartest option. The goal here is not just to help you get the wheel off and on. It is to help you do it correctly, safely, and confidently.
From a search-quality perspective, Google recommends content that is helpful, reliable, and written for people first, with clear headings and language users naturally search for. Google also advises using descriptive titles, useful headings, and expert or experienced sources where relevant. That is why this article focuses on real-world steps, clear safety advice, and practical judgment instead of fluff.
Why Knowing How to Change a Tire Matters
Knowing steps on how to change a tire is not just about convenience. It can keep a minor breakdown from turning into a bigger problem. Driving too far on a flat can damage the tire, the wheel itself, and in some cases suspension components. AAA advises drivers not to continue driving farther than necessary on a flat, because extra movement can worsen the damage and make repair less likely.
There is also the safety factor. NHTSA emphasizes tire maintenance and replacement as core parts of safe driving, and it reminds drivers to use the correct tire size and inflation information listed in the owner’s manual or vehicle placard. If you know how to install the spare correctly and verify inflation afterward, you are in a much better position than someone guessing on the shoulder of a highway.
On a practical level, the ability to change a tire helps you make smarter decisions. Sometimes the right move is to do the job yourself. Sometimes the right move is to call roadside assistance, especially when traffic, darkness, weather, or unstable ground make the situation risky. AAA states plainly that roadside service can change the tire for you if a usable spare is available, or tow the vehicle if it is not.
What You Need Before You Start
Before learning how to change a tire with a jack, you need to know what tools should already be in your vehicle. Most passenger cars include a spare tire or temporary spare, a jack, and a lug wrench. AAA also recommends useful extras such as gloves, a flashlight, and a tire gauge.
The most important items are the spare tire, the jack that matches your vehicle, and the lug wrench that fits your lug nuts. If any one of those is missing, the process becomes much harder or impossible. A lot of drivers discover too late that their spare is underinflated or that their locking lug nut key is missing. That is why checking your equipment before an emergency is part of knowing how to change a tire step by step.
You should also know where your jack points are. These are reinforced spots under the vehicle designed to take the load of lifting. Lifting in the wrong place can bend metal, damage trim, or create instability. Your owner’s manual is the best source for this. NHTSA also stresses using the correct tire size and inflation information from the placard or manual when replacing tires.
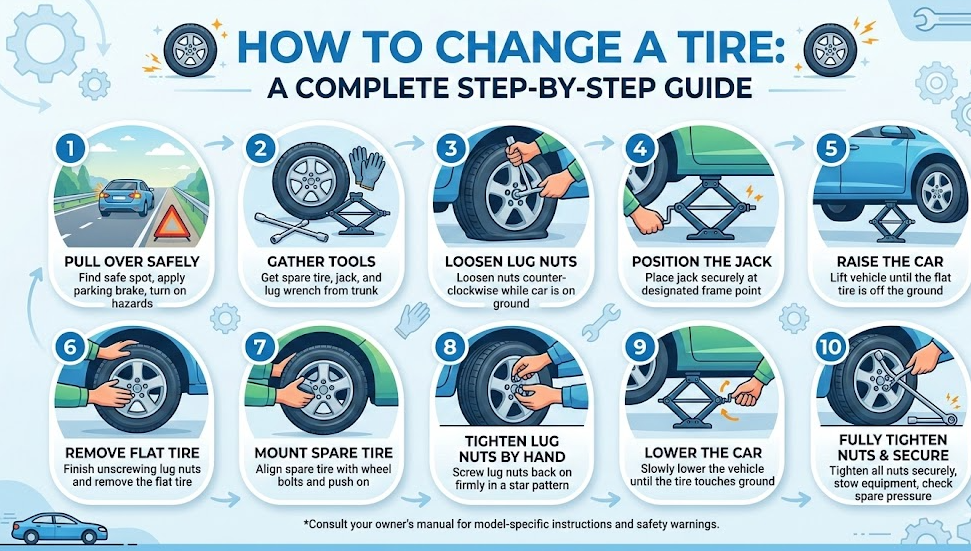
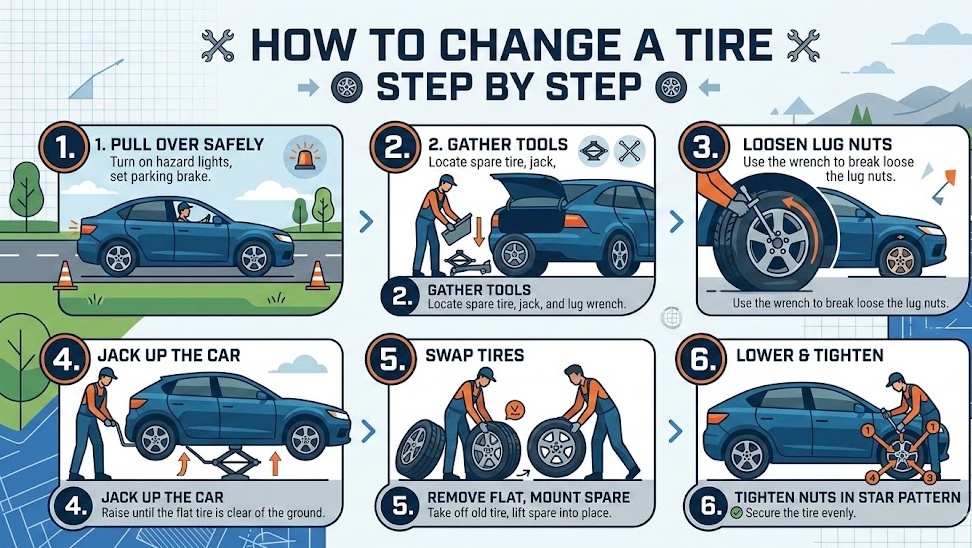
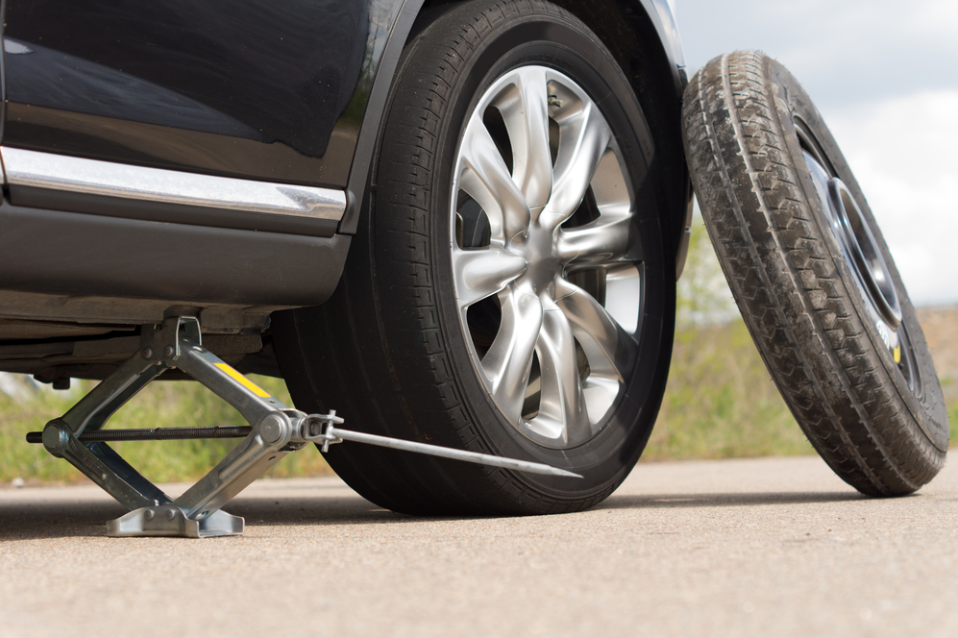
How to Change a Tire on a Car
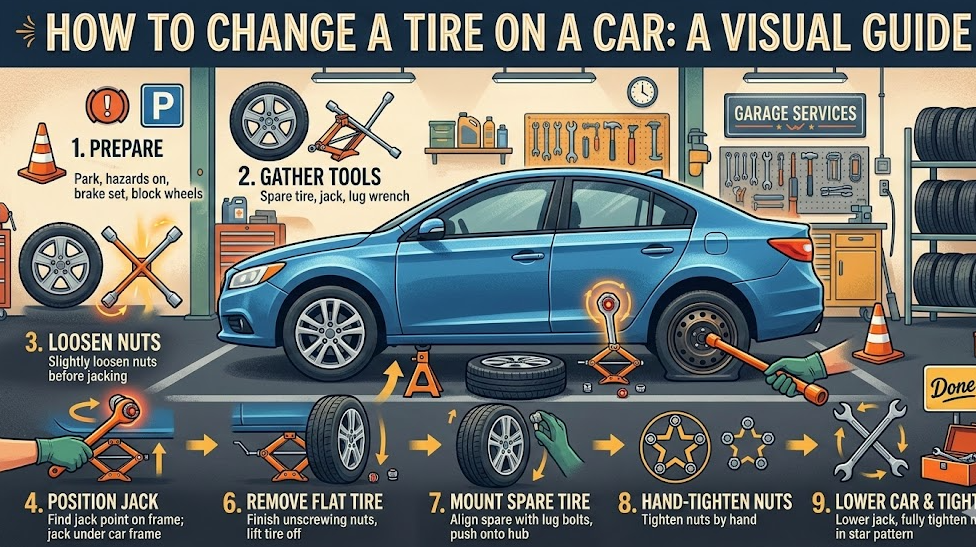
If you want the classic answer to how to change a tire on a car, this is the safest and most reliable sequence.
First, pull over to a safe location. Look for a flat, stable surface away from traffic. Avoid soft shoulders, mud, gravel that shifts easily, or sloped ground. Turn on your hazard lights and set the parking brake. If you have wheel wedges or bricks, place them on the opposite side of the flat to reduce rolling risk. Safety comes before speed.
Next, take out the spare, jack, and lug wrench. Remove the hubcap if needed. Before lifting the car, loosen each lug nut slightly while the flat tire is still touching the ground. This matters because the tire has resistance and will not spin freely. Use steady pressure. If the nuts are very tight, you may need controlled body weight on the wrench, but avoid jerking motions that can slip and injure you.
Now position the jack at the correct lifting point and raise the vehicle until the flat tire is just off the ground. Remove the loosened lug nuts fully and pull the wheel straight toward you. Install the spare by aligning the wheel holes with the studs or hub. Hand-thread the lug nuts first so they do not cross-thread. Lower the car until the spare touches the ground enough to resist spinning, then tighten the nuts in a star pattern. Lower the vehicle completely and tighten again firmly.
AAA’s guidance follows this same overall order: secure the vehicle, locate the tools and spare, loosen nuts before lifting, jack the car up correctly, mount the spare, and tighten securely.
Also Read:- How to Write a Cover Letter Complete Guide
How to Change a Tire Step by Step
A lot of people search for how to change a tire step by step because they want a checklist they can trust under pressure. The most common mistakes happen before the wheel even comes off. Drivers stop too close to traffic, forget the parking brake, lift on an uneven surface, or fail to loosen the nuts before jacking. Each one increases risk.
Another frequent mistake is rushing the reinstallation. The spare may seem to fit, but if the lug nuts are not started by hand, you can cross-thread them. That damages the threads and can create an unsafe wheel connection. The second common reinstall error is tightening in a circular sequence instead of a crisscross or star pattern. The star pattern helps seat the wheel evenly against the hub.
The final mistake is assuming the job ends when the wheel is on. It does not. You should check the spare’s pressure as soon as possible, drive conservatively, and have the original tire inspected or replaced. Many temporary spare tires have speed and distance limits, and driving beyond them can be unsafe. AAA and roadside safety guidance consistently treat the spare as a short-term solution, not a long-term replacement.
Also Read:- How to Make Brown Sugar: The Complete Home Guide
How to Change a Tire on a Rim
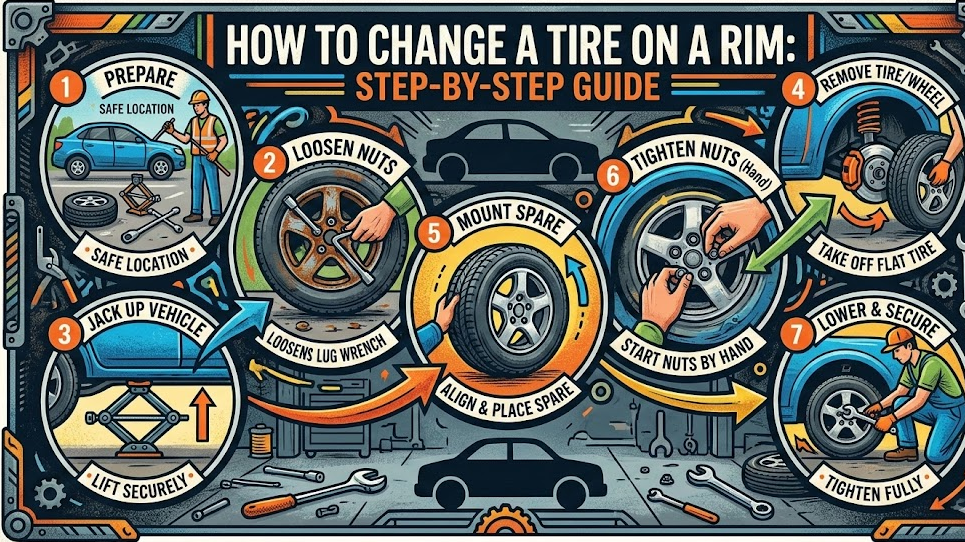
The phrase how to change a tire on a rim can mean two different things. It may mean changing the whole wheel-and-tire assembly on the vehicle, or it may mean removing the rubber tire from the metal wheel rim itself. Those are very different jobs.
If you mean replacing the wheel assembly on the car, the process is the same as changing a flat tire: remove the damaged wheel, mount the spare wheel, and tighten properly. But if you mean removing the tire from the wheel rim and mounting a new tire onto that rim, that is usually a workshop job. It requires tire irons or mounting equipment, bead breaking force, and inflation equipment strong enough to seat the bead safely.
For most drivers, changing a tire “on a rim” by hand is not recommended unless it is a bicycle tire or a specialty off-road situation. Passenger vehicle tires are tightly seated to the rim, and improper removal or installation can damage the bead, the wheel, or the tire pressure sensor. In short, learn how to change a tire on a car yourself, but treat full tire mounting and balancing on a rim as a professional task unless you have the right tools and experience.
Also Read:- How to Cook Beets (Complete Guide for Beginners)
How to Change a Tire With a Jack
When people ask how to change a tire with a jack, they are really asking how to lift the vehicle safely. This is where confidence and caution need to work together.
The first rule is placement. Every vehicle has designated lift points. A scissor jack, bottle jack, or factory jack must contact those reinforced points, not a random suspension arm or body panel. The owner’s manual shows the location. Place the jack squarely, keep the base flat on solid ground, and raise the vehicle slowly. If the jack leans or sinks, stop immediately and reposition.
The second rule is stability. Never put any part of your body under a vehicle supported only by a jack during a roadside tire change. A jack is for lifting, not for safely supporting a person beneath the car. If the ground is soft, place a wide, sturdy board under the jack base if available. If conditions are too unstable, roadside help is the safer choice.
The third rule is height. You only need the flat tire high enough to clear the ground and allow the spare to mount. Lifting higher than needed adds instability. Once the spare is installed, lower the vehicle gradually and finish tightening the lug nuts on the ground. That final tightening is what helps secure the wheel correctly.
Also Read:- How to Choose a Laptop (2025 Complete Guide)
How to Change a Tire Without a Jack
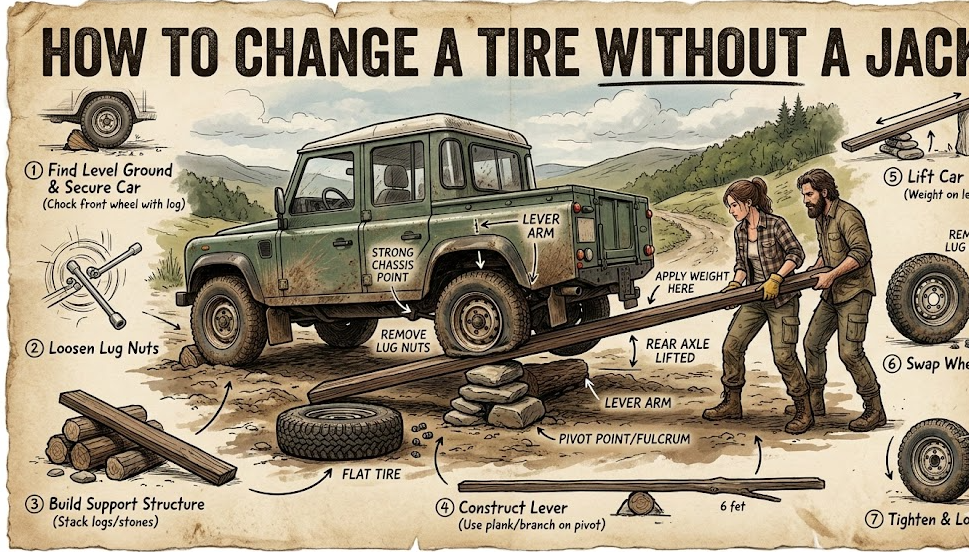
A lot of people search how to change a tire without a jack hoping for an emergency workaround. The honest answer is simple: in most normal roadside situations, you cannot safely replace a car or truck wheel without some lifting method. The flat wheel has to come off the ground for the spare to go on.
There are a few edge cases. Off-road drivers sometimes use terrain, ramps, recovery boards, or improvised methods to lift a wheel enough for a swap, but these are specialized techniques with real risk. They are not reliable public-road advice for the average driver. For everyday drivers, no jack usually means your best options are roadside assistance, a tow, or help from another motorist with the proper equipment.
That may sound less dramatic than a DIY hack, but it is the trustworthy answer. AAA specifically notes that flat tire service depends on having a serviceable spare or otherwise towing the vehicle. A “no-jack” tire change is usually not a smart emergency skill to improvise. It is a moment to prioritize safety and support.
Also Read:- How to Learn JavaScript: A Comprehensive Guide for Beginners
How to Change a Tire on a Truck

Learning how to change a tire on a truck follows the same fundamentals as a car, but the scale is different. Truck wheels are heavier, the ride height is taller, and the jacking points and load requirements are more demanding.
The biggest difference is equipment capacity. A jack that works for a sedan may be inadequate for a truck. The spare itself may also be harder to access, especially on pickups where it is stored under the bed. Lug nuts can be torqued tighter, and rust or road grime may make them stubborn. This means that physical effort and leverage matter more.
Truck drivers also need to pay close attention to replacement tire size and load suitability. NHTSA advises using the tire size recommended by the manufacturer or another approved size listed for the vehicle. If you mount a spare that is undersized, underinflated, or not suitable for the load, handling and braking can suffer. On heavier vehicles, if the shoulder is narrow or traffic is fast, it is often wiser to call assistance rather than wrestle with a heavy wheel in a dangerous spot.
Also Read:- How to Surf: The Ultimate Guide
How to Change a Tire on a Bike
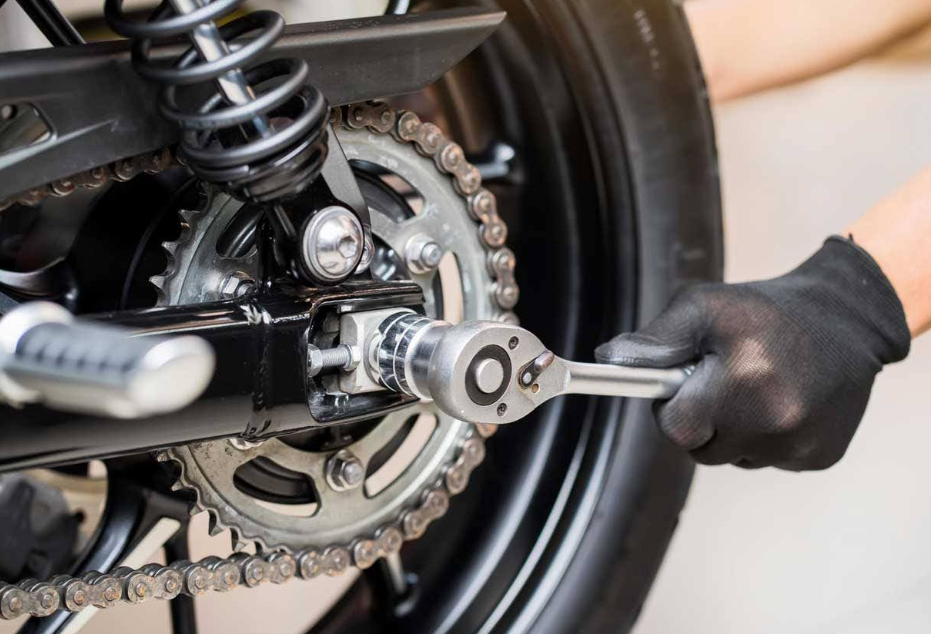
The phrase how to change a tire on a bike is much more realistic as a true do-it-yourself project. Bicycle tires are designed to be removed and reinstalled with simpler tools, usually tire levers, a pump, and sometimes a patch kit or spare tube.
Start by shifting to the smallest rear cog if it is the back wheel, then remove the wheel from the bike. Let all remaining air out of the tire. Use tire levers to lift one bead over the rim edge and work around until one side is free. Pull out the tube, inspect the tire carefully for glass, thorns, or debris, and check the rim tape. If you do not remove the cause of the puncture, the new tube may fail immediately.
Then place a small amount of air in the new tube so it takes shape, insert it into the tire, and work the tire bead back onto the rim by hand as much as possible. Inflate slowly and check that the bead seats evenly all the way around. In the bike world, how to change a tire by hand is actually standard practice, unlike passenger car tires where bead seating is a specialized job.
Also Read:- How to Change Oil: A Complete Guide for Cars, Lawn Mowers, and More
How to Change a Tire by Hand

The keyword how to change a tire by hand also needs context. On a car, this usually means swapping the wheel assembly using hand tools rather than powered tools. That is absolutely possible and is exactly how most roadside tire changes happen. A lug wrench, jack, and your hands are enough.
But if the phrase means removing the rubber tire from the rim itself entirely by hand, that depends on the vehicle. Bicycle tires, wheelbarrow tires, and some small off-road tires can often be removed manually. Passenger car tires are another story. Their beads are tight, and proper mounting usually requires machines or at least dedicated tire irons and inflation tools. Without those, you risk damaging the tire or wheel and may not get a safe seal.
So the practical answer is this: yes, you can change a flat car wheel by hand tools; no, most people should not attempt to manually mount and seat a car tire onto a rim without proper equipment. That distinction saves people from taking on the wrong job.
Also Read:- How to Ski: A Complete Guide to Skiing Techniques, Tips, and Safety
How to Change a Tire Pressure Sensor
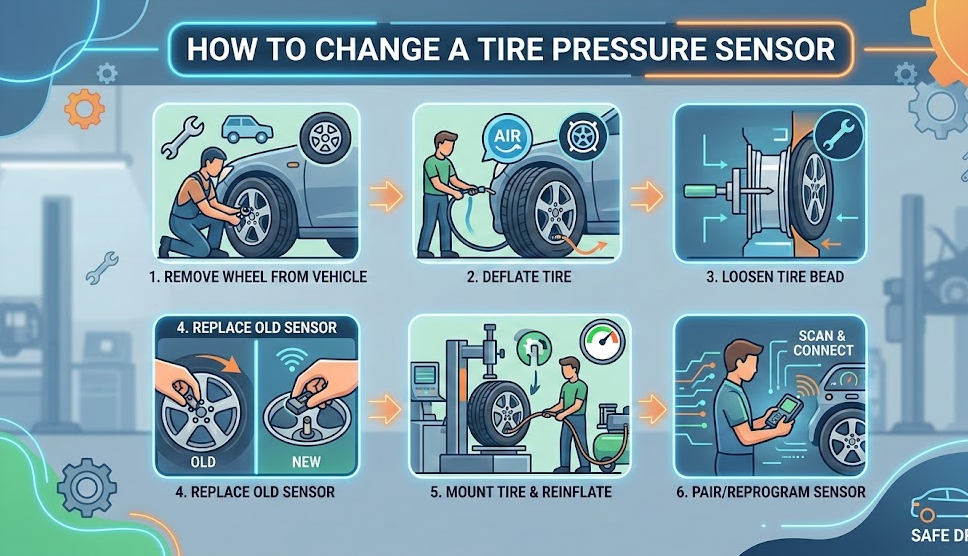
When someone asks how to change a tire pressure sensor, they are usually referring to the TPMS sensor inside the wheel. This is not part of a normal roadside tire change. It is part of the wheel-and-tire assembly and often attaches at the valve stem or band inside the rim.
Replacing it generally requires the tire bead to be broken from the rim, which is a shop-level task for most drivers. On many vehicles, the new sensor also needs to be programmed or relearned so the car recognizes it correctly. The exact procedure varies by manufacturer. Some vehicles relearn automatically after driving; others require a scan tool or a manual sequence.
This matters during a tire change because careless handling during tire mounting can damage the TPMS sensor. If your tire warning light remains on after installing a spare or after a tire service, the issue may be pressure, a damaged sensor, or a system reset requirement. For that reason, TPMS replacement is usually best treated as a technician job, not part of your roadside spare installation.
Also Read:- How to Convert 56 Inches in Feet
How to Change a Tire Valve Stem

The search phrase how to change a tire valve stem sounds simple, but on a car it is not usually a roadside task. The valve stem passes through the wheel and helps hold air pressure. On many modern cars, it may also be integrated with the TPMS sensor.
To replace a standard rubber valve stem correctly, the tire usually has to be deflated and at least partially separated from the rim so the old stem can be removed and the new one pulled through. That means proper bead access and the right tools. If the stem is leaking slowly, a temporary correction might involve replacing the valve core or cap, but a damaged stem itself usually needs proper service.
NHTSA emphasizes routine tire checks and proper inflation as part of safe driving. So while a leaking valve stem is not glamorous, it matters. If your flat was caused by stem failure rather than a puncture, changing the wheel gets you moving again, but stem replacement should still be handled correctly before the original wheel goes back into service.
Also Read:- How to Play Piano: A Complete Beginner to Advanced Guide
What to Do After You Change the Tire
After you finish the physical work, do not treat the job as complete. A spare tire is often a temporary solution. Check the pressure as soon as you can, because an underinflated spare is unsafe. NHTSA recommends regular pressure checks and close attention to tread condition and tire health.
Then drive conservatively. Avoid hard cornering, high speeds, and long distances until the original tire is inspected. If you used a compact temporary spare, check the tire sidewall or your owner’s manual for speed and distance limits. Also have the lug nuts checked for proper torque if possible, especially after driving a short distance.
Finally, get the damaged tire professionally inspected. Not every flat requires replacement. Some punctures are repairable, while sidewall damage, severe tread damage, or driving too long while flat may mean the tire is finished. If tread depth is too low, replacement is the correct move. NHTSA notes that 2/32 of an inch is a replacement threshold and references the penny test as one consumer check.
Conclusion
Learning how to change a tire is one of those skills that feels small until the day you really need it. Once that day comes, it is huge. The process itself is straightforward: stop safely, secure the vehicle, loosen the lug nuts, lift the car correctly, install the spare, tighten in the right pattern, and drive carefully afterward. But the real skill is judgment. You need to know when to do it yourself, when a missing jack or unstable ground changes the plan, and when professional help is the safer answer.
Whether you were searching for how to change a tire on a car, how to change a tire with a jack, how to change a tire on a truck, how to change a tire on a bike, or even related issues like how to change a tire pressure sensor or how to change a tire valve stem, the key takeaway is the same: safety first, correct tools second, speed last. A careful five-minute setup is better than a rushed dangerous repair.
FAQs About How to Change a Tire
Can I drive a little farther on a flat tire before changing it?
You should avoid driving farther than necessary. Even a short distance can damage the tire beyond repair and may harm the wheel. AAA specifically warns against going too far on a flat because it can worsen the situation.
How long does it take to change a tire?
For someone prepared with the right tools, it often takes around 15 to 30 minutes. The exact time depends on traffic conditions, lug nut tightness, weather, and whether the spare is easy to access.
Is it safe to change a tire on the side of a highway?
Not always. If traffic is close, the shoulder is narrow, the ground is unstable, or visibility is poor, roadside assistance may be the safer choice. A tire can be replaced later; your safety cannot.
Can I learn how to change a tire without a jack?
Not in the normal practical sense for a car or truck. Without a lifting method, the flat wheel cannot be removed properly. In most cases, the safe answer is roadside service or a tow.
Do all cars have a spare tire?
No. Some modern vehicles come with a repair kit, run-flat tires, or no spare at all. You should check your trunk, cargo area, or underfloor storage in advance so you are not surprised during an emergency.
What is the difference between changing a tire and replacing a tire?
Roadside drivers usually mean changing the wheel assembly by installing a spare. Replacing a tire often means removing the rubber tire from the wheel rim and mounting a new one, which is usually a shop job.
Can I change a tire by hand without power tools?
Yes, for a normal roadside wheel swap. A jack and lug wrench are hand tools and are the standard way to do it. But mounting a passenger car tire onto a rim entirely by hand is another matter and usually requires specialized equipment.
Do I need to replace the TPMS sensor when I get a flat?
Not automatically. The sensor only needs replacement if it is damaged, dead, leaking, or malfunctioning. But if the tire must be removed from the rim, it is a good time for a technician to inspect it.
How do I know when a tire must be replaced instead of repaired?
Small punctures in the tread area may be repairable, depending on damage and local repair standards. Sidewall damage, major cuts, and severe wear usually mean replacement is necessary. NHTSA notes that 2/32 inch tread depth is the point where replacement is due.
For More Visit Accurate Unit Convert


Leave a Reply