Learning how to make a paper airplane is one of the simplest and most enjoyable creative activities. With just a single sheet of paper and a few easy folds, you can create a flying craft that glides through the air, travels long distances, and even performs tricks. Paper airplanes have been popular for generations because they combine creativity, science, and fun in a way that anyone can enjoy.
Many people think paper airplanes are just toys, but they actually demonstrate important principles of aerodynamics such as lift, drag, thrust, and balance. When you understand how folds affect flight, you can build designs that fly farther, faster, and more smoothly.
This comprehensive guide explains how to make a paper airplane step by step, including easy beginner models, long-distance designs, jet-style airplanes, and gliders. You will also learn practical tips that improve flight performance and help your paper airplanes travel farther.
Whether you are a beginner, a student exploring science concepts, or someone simply looking for a fun activity, this guide will teach you everything you need to know.
How to Make a Paper Airplane Easy
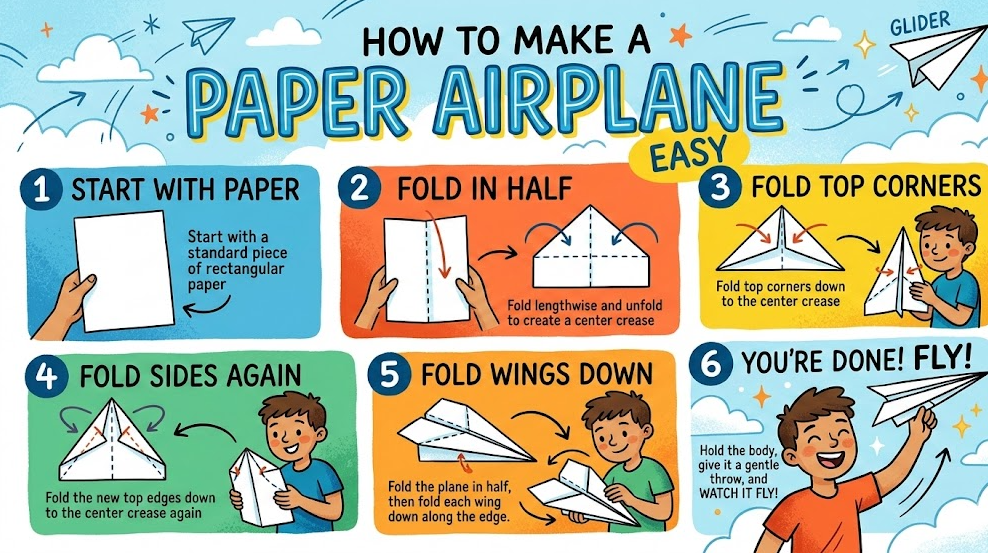
A beginner-friendly method is the best place to start when learning how to make a paper airplane easy. Simple designs require fewer folds, making them quick to build while still flying smoothly. Even young children can create these models without difficulty.
The goal of an easy paper airplane is to maintain symmetry, balance, and lightweight structure. These factors help the airplane glide smoothly instead of diving or spinning.
Below are the essential steps and concepts for making an easy paper airplane.
Simple Paper Selection
Before starting, choosing the right paper makes a significant difference in flight performance. Standard printer paper works well because it has the ideal balance between strength and flexibility.
. Using standard A4 or letter-size paper ensures consistent folding and stable wings. Thin paper can tear easily during folding, while thick paper may prevent smooth gliding. A moderate weight paper allows the airplane to maintain lift and glide across longer distances without collapsing during flight.
. Smooth paper surfaces improve airflow across the wings. When the paper has fewer textures or creases, air flows evenly along the wing surface, producing better lift. This helps beginner airplanes stay stable in the air instead of wobbling during flight.
. Avoid heavily folded or wrinkled sheets because they disrupt the airplane’s aerodynamic balance. Clean paper with crisp folds ensures that both wings remain symmetrical, which is critical for stable flight.
Basic Folding Structure
Creating a strong folding structure is the foundation of every good paper airplane. The first folds determine the nose shape, body balance, and wing alignment.
. Start by folding the paper in half lengthwise to create a center crease. This crease acts as the guiding line for all future folds, helping maintain symmetry between both sides of the airplane.
. Fold the top corners down toward the center line to form a triangular nose. This step strengthens the front section of the airplane, allowing it to cut through air efficiently.
. Fold the angled edges toward the center again to create a narrower nose. This produces a streamlined design that reduces air resistance and improves flight distance.
Creating Balanced Wings
Balanced wings are essential for a stable and predictable flight path. Even small differences between wing angles can cause the airplane to veer sideways.
. Fold the airplane in half along the center crease so the nose remains on the outside. This creates the main body structure that supports the wings.
. Fold each side downward to form wings of equal size. Large wings generate more lift, which helps the airplane glide longer.
. Adjust wing tips slightly upward to create stabilizers. These small adjustments improve balance and prevent the airplane from diving downward.
Testing and Adjusting
Even a simple airplane benefits from testing and small improvements.
. Launch the airplane gently at a slight upward angle to test its glide. Throwing too hard can disrupt the balance and shorten the flight.
. Observe how the airplane behaves in the air. If it dives quickly, slightly bend the wings upward to increase lift.
. Continue adjusting until the airplane glides smoothly and travels farther with each throw.
Also Read:- How to Draw a Face: Complete Beginner Guide
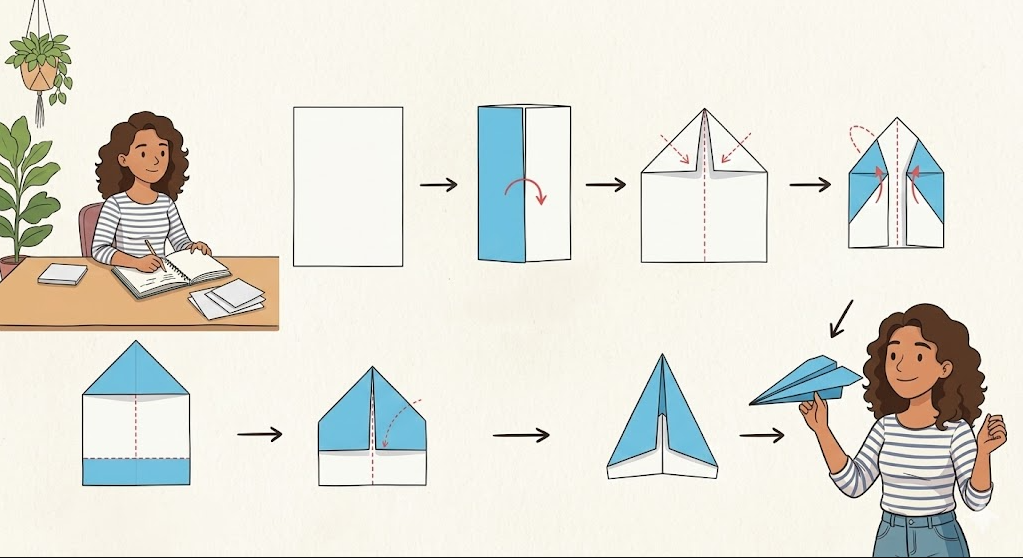
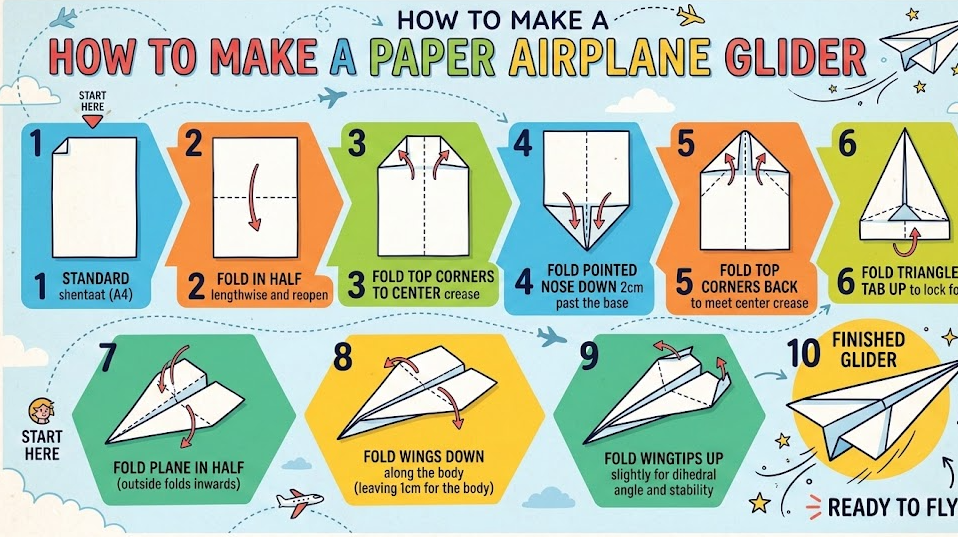
How to Make a Paper Airplane Step by Step
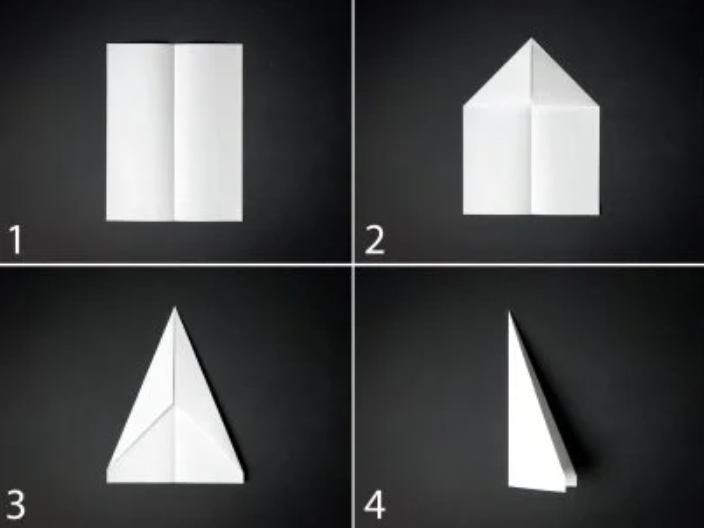
Understanding how to make a paper airplane step by step ensures that each fold contributes to a well-balanced and aerodynamic design. Careful folding techniques help produce airplanes that fly smoothly and consistently.
Step 1: Fold the Paper in Half
The center fold is the most important structural feature of a paper airplane.
. Begin with a flat sheet of paper placed vertically. Fold it in half lengthwise and press the crease firmly to create a straight center line. This fold ensures both sides remain symmetrical throughout the construction process.
. The center line acts as a reference for all other folds. Without it, the wings and body could become uneven, causing unstable flight patterns.
. A sharp crease also strengthens the airplane’s body, helping it maintain shape during repeated throws.
Step 2: Shape the Nose
The nose determines how well the airplane cuts through the air.
. Fold both top corners down to meet the center line. This triangular fold creates the basic nose shape while reinforcing the front section.
. Fold the angled edges toward the center again to narrow the nose. A sharper nose reduces drag and allows the airplane to travel farther.
. Press each crease carefully to maintain symmetry, ensuring that the airplane flies straight.
Step 3: Form the Wings
Wings are responsible for creating lift.
. Fold the entire airplane in half along the original center crease, keeping the triangular folds on the outside.
. Fold one side downward to form the first wing, aligning it parallel with the airplane body.
. Repeat the process on the opposite side so both wings are equal in size and angle.
Step 4: Adjust Wing Tips
Wing tip adjustments stabilize flight.
. Slightly bend the back edges of the wings upward to create small stabilizers.
. These stabilizers help maintain balance by controlling airflow across the wings.
. Even small adjustments can significantly improve flight distance and stability.
Also Read:- How to Delete Instagram Account (Complete Step-by-Step Guide 2025)
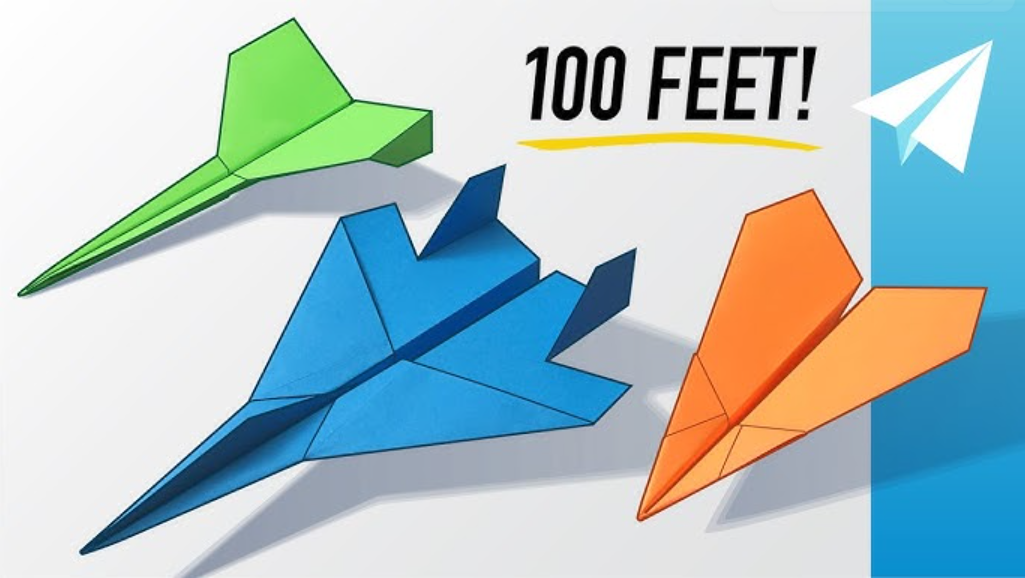
How to Make a Paper Airplane That Flies Far
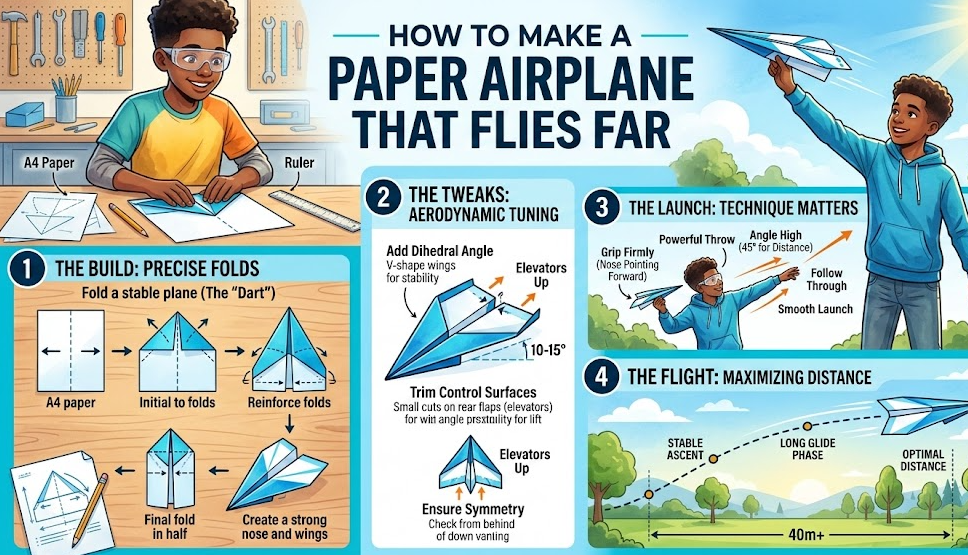
Designing a plane that travels long distances requires understanding aerodynamics.
Aerodynamic Nose Design
. A narrow and reinforced nose reduces air resistance and allows the airplane to maintain speed.
. The sharper the nose, the easier it cuts through the air during forward motion.
. This design improves long-distance flight performance.
Long Wing Structure
. Long wings provide more surface area for lift.
. When air flows across large wings, it generates stronger upward force.
. This keeps the airplane airborne longer.
Proper Throwing Technique
. A smooth forward throw helps maintain stable airflow across the wings.
. Throwing too hard can cause the airplane to dive or spin.
. Gentle launches produce the longest flights.
Also Read:- How to Change Reddit Username (Simple Guide 2025–2026)
How to Make a Paper Airplane Jet
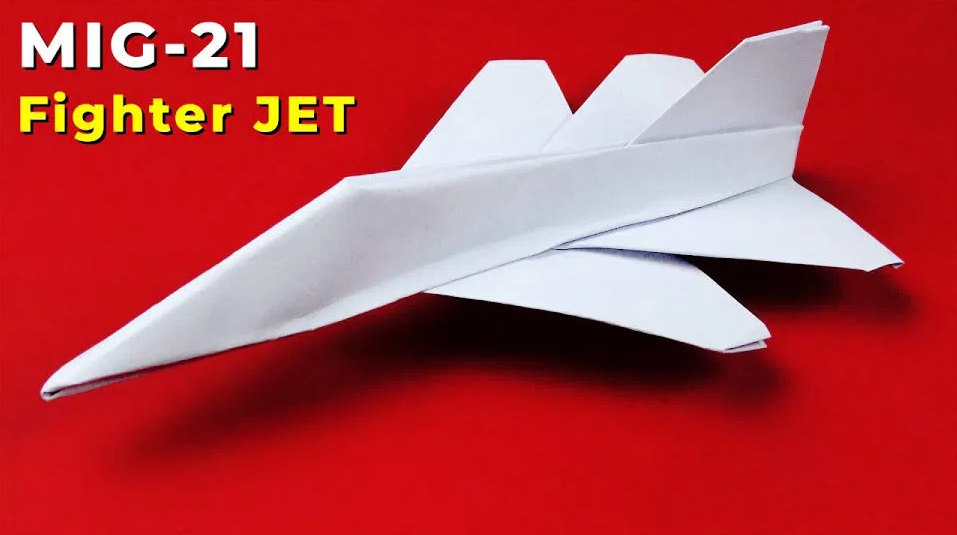
Jet-style paper airplanes are designed for speed and sharp forward flight.
Slim Body Design
. A narrow body reduces drag and increases speed.
. Slim shapes allow the airplane to move quickly through air.
. This design mimics real jet aircraft structures.
Small Wings
. Jet airplanes usually have smaller wings than gliders.
. Small wings reduce lift but increase speed.
. This allows the airplane to travel quickly in a straight path.
Reinforced Nose
. The nose must be strong enough to maintain shape during fast throws.
. Multiple folds strengthen the front structure.
. A strong nose keeps the airplane balanced at high speed.
Also Read:- How to Make Sourdough Starter (Simple Beginner Guide)
How to Make a Paper Airplane Glider
Gliders focus on long, smooth flights rather than speed.
Wide Wing Design
. Wide wings generate large amounts of lift.
. This allows the airplane to float gently through the air.
. Gliders often travel slowly but stay airborne longer.
Lightweight Structure
. A lighter body improves glide efficiency.
. Heavy designs drop quickly due to gravity.
. Light paper and simple folds enhance gliding ability.
Wing Angle Adjustment
. Slight upward wing angles improve stability.
. Proper wing angles balance lift and gravity.
. This results in long, floating flights.
Also Read:- How to Convert 70 Meters to Feet
How to Make a Paper Airplane Launcher
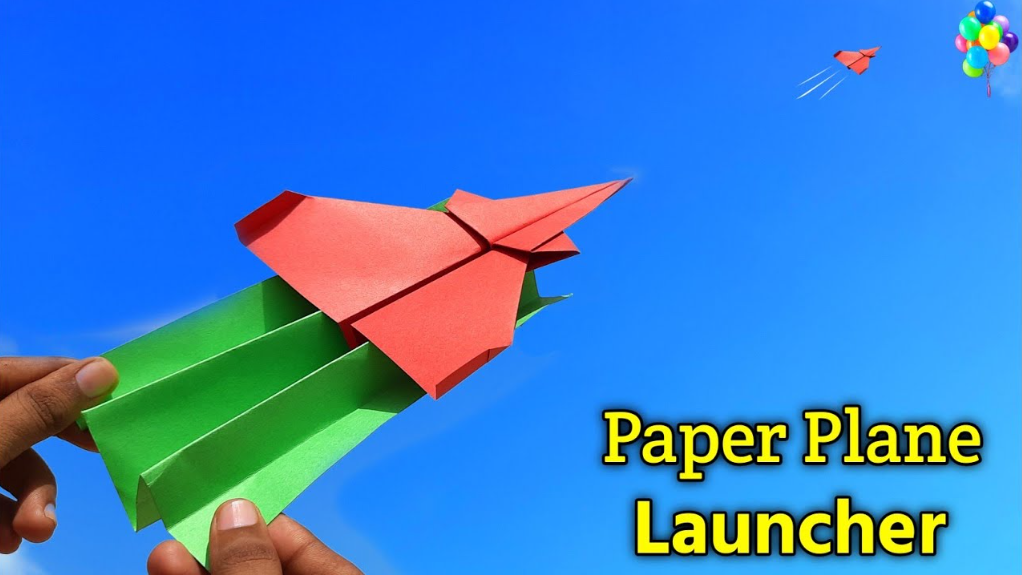
A launcher helps increase flight distance by adding extra force.
Simple Rubber Band Launcher
. A rubber band attached to the airplane body can act as a slingshot.
. Pulling the rubber band backward stores energy.
. Releasing it launches the airplane at higher speed.
Straw Launcher
. A drinking straw can serve as a guide for launching airplanes.
. Place the airplane on the straw and blow gently.
. The air pressure pushes the airplane forward.
Safety Considerations
. Always launch airplanes in open spaces.
. Avoid aiming toward people or fragile objects.
. Safe launching keeps the activity enjoyable for everyone.
Also Read:- How to Convert 56 cm to Inches in Seconds
Tips to Make Paper Airplanes Fly Better
Improving flight performance requires small adjustments.
. Keep folds sharp and symmetrical to maintain balance. Uneven folds often cause airplanes to drift sideways during flight.
. Experiment with wing angles and stabilizers. Small changes can dramatically improve glide distance and stability.
. Test different designs and throwing techniques to find the best combination for distance and accuracy.
Also Read:- How to Convert Acres to Square Feet – Complete Step-by-Step Guide
Conclusion
Learning how to make a paper airplane is both entertaining and educational. With a simple sheet of paper and a few careful folds, anyone can build airplanes that glide smoothly, travel long distances, or zoom forward like jets.
By understanding basic folding techniques, wing balance, and aerodynamics, you can experiment with different designs and improve your airplanes’ performance. From easy beginner models to advanced gliders and jet designs, the possibilities are endless.
Paper airplanes are more than just toys—they are a simple introduction to engineering, creativity, and physics. With practice and experimentation, you can design airplanes that fly farther, faster, and more smoothly than ever before.
FAQs About How to Make a Paper Airplane
What paper is best for making paper airplanes?
Standard printer paper works best because it provides the right balance between strength and flexibility.
Why do some paper airplanes fly farther than others?
Flight distance depends on wing size, balance, aerodynamics, and how the airplane is thrown.
How can I make my paper airplane fly farther?
Use symmetrical folds, larger wings for lift, and launch the airplane with a smooth forward motion.
What is the easiest paper airplane design?
The classic dart airplane is considered the easiest because it uses only a few folds.
Can paper airplanes teach science concepts?
Yes. They demonstrate aerodynamics principles such as lift, drag, thrust, and gravity.
For more, visit Accurate Unit Convert