
Chromebooks are popular laptops because they are fast, simple, and easy to use. However, many new users often ask how to take a screenshot on Chromebook because the keyboard looks a little different compared to Windows laptops.
A screenshot is simply an image of whatever is currently displayed on your screen. It is very helpful for saving important information, sharing something with friends, or creating tutorials.
Chromebooks run on ChromeOS, which is developed by Google. Because of this, the screenshot shortcuts are different from traditional Windows computers. Once you learn the basic shortcuts, taking screenshots becomes extremely quick and easy.
In this guide, you will learn:
- how to take a screenshot on chromebook with keyboard
- how to take a screenshot on chromebook without windows key
- how to take a screenshot on chromebook laptop
- how to take a screenshot on chromebook acer, hp, lenovo, asus, and samsung
Let’s start with the easiest methods.
How to Take a Screenshot on Chromebook With Keyboard
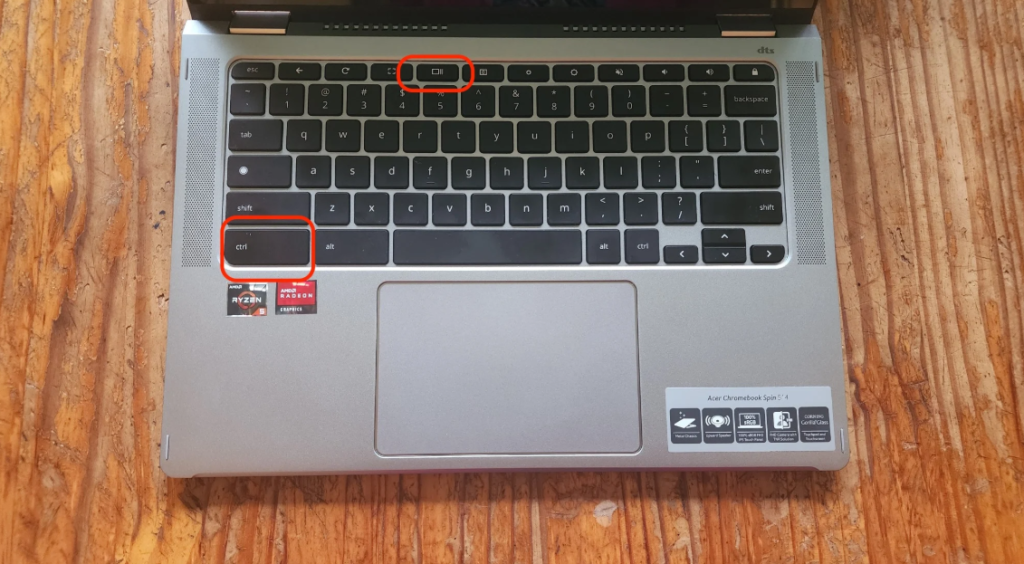
The fastest way to capture your screen is by using keyboard shortcuts. Chromebook keyboards include a special key called the Show Windows key, which replaces the Windows key found on other laptops.
Follow these simple steps to take a screenshot using the keyboard.
Press Ctrl + Show Windows Key
This shortcut captures the entire screen instantly. After pressing the keys, the Chromebook automatically saves the screenshot in the Downloads folder. A small notification will appear in the corner of your screen confirming that the screenshot was taken successfully.
Use Ctrl + Shift + Show Windows Key
If you only want to capture a specific part of the screen, this shortcut is very useful. When you press these keys, your cursor will turn into a selection tool. You can click and drag to choose the area you want to capture.
Capture a specific window
Chromebooks also allow you to capture a single window instead of the full screen. Open the screenshot toolbar and select the window option. Then click on the window you want to capture.
Use the Screenshot Toolbar
ChromeOS includes a built-in screen capture toolbar that provides multiple screenshot options. It allows users to capture the full screen, a partial area, or record their screen.
Quick editing after screenshot
After capturing a screenshot, ChromeOS shows a preview notification. Clicking the preview allows you to crop, edit, or annotate the screenshot easily.
Keyboard shortcuts improve productivity
Using shortcuts helps users take screenshots quickly without opening menus or installing apps. This is especially helpful for students, teachers, and professionals.
How to Take a Screenshot on Chromebook Without Windows Key
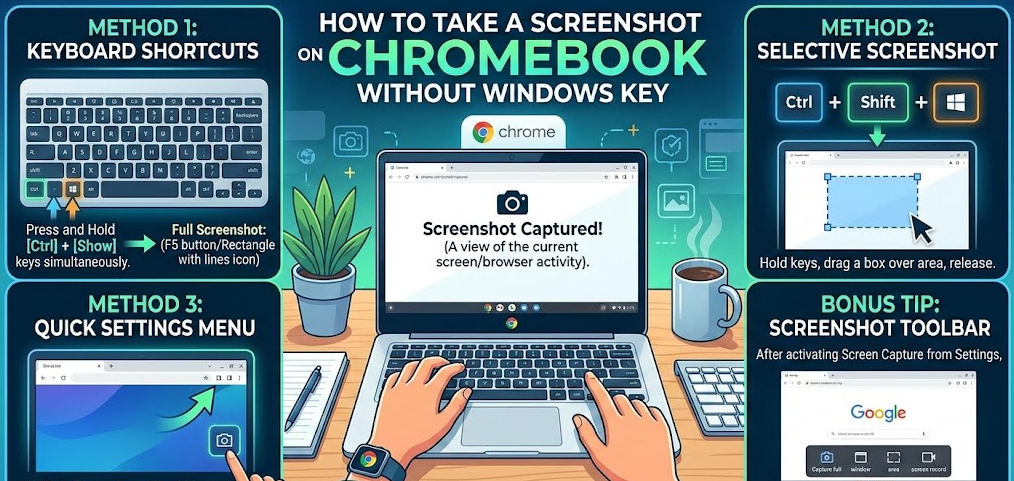
Many Chromebook users get confused because their keyboard does not have a traditional Windows key. Instead, Chromebooks use the Show Windows key, which looks like a rectangle with two lines beside it.
Even without the Windows key, screenshots are still very easy to capture.
Use the Show Windows key instead
The Show Windows key performs the screenshot function on Chromebooks. Pressing Ctrl + Show Windows captures the entire screen quickly.
Open the Quick Settings menu
Click the time in the bottom-right corner of the screen. From the menu that appears, select the Screen Capture option. This opens the screenshot toolbar.
Use touchscreen controls
Some Chromebooks support tablet mode. In this mode, you can take screenshots using the power button and volume down button.
Install Chrome screenshot extensions
If you need advanced features like scrolling screenshots or annotations, Chrome extensions can help. These tools add additional screenshot functionality.
Use the stylus or touch selection
On touchscreen Chromebooks, users can select specific screen areas using touch or a stylus.
Screenshot tool works on all ChromeOS devices
Because ChromeOS is standardized, the screenshot tools work similarly on all Chromebook models.
Also Read:- How to Make Brown Sugar: The Complete Home Guide
How to Take a Screenshot on Chromebook Laptop
Taking screenshots on a Chromebook laptop is extremely simple once you know the shortcuts. The process is identical across most Chromebook brands because they all run ChromeOS.
Here are the most common screenshot methods for Chromebook laptops.
Full screen screenshot
Press Ctrl + Show Windows to capture everything displayed on the screen. This is the easiest and fastest method.
Partial screenshot
Press Ctrl + Shift + Show Windows to capture a selected area of the screen.
Window screenshot
Use the screenshot toolbar and select the window capture option. Then click the window you want to capture.
Automatic file saving
All screenshots are automatically saved in the Downloads folder, making them easy to find later.
Instant screenshot preview
A preview notification appears immediately after taking the screenshot. Clicking it opens editing options.
Easy sharing options
Screenshots can be shared through email, messaging apps, or uploaded to cloud storage.
Also Read:- How to Write a Cover Letter Complete Guide
How to Take a Screenshot on Chromebook Acer, HP, Lenovo, Asus, and Samsung
Many users search for screenshot instructions based on their laptop brand. The good news is that the screenshot process is the same for all Chromebook manufacturers.
Chromebooks from companies like Acer, Lenovo, HP, Asus, and Samsung use the same ChromeOS shortcuts.
Acer Chromebook
Use Ctrl + Show Windows to capture the entire screen.
Lenovo Chromebook
Use Ctrl + Shift + Show Windows to capture a specific area.
HP Chromebook
Use the screenshot toolbar for full screen or window screenshots.
Asus Chromebook
All ChromeOS screenshot shortcuts work the same way.
Samsung Chromebook
Tablet-mode Samsung Chromebooks support power + volume down screenshots.
All Chromebook brands use ChromeOS
Because they share the same operating system, screenshot commands remain consistent across devices.
Also Read:- How to Use TikTok: Complete Beginner to Pro Guide
Where Chromebook Screenshots Are Saved
After taking a screenshot, you might wonder where the file is stored.
Chromebooks automatically save screenshots in the Downloads folder inside the Files app.
Screenshots are saved as PNG image files.
Files appear instantly in the Downloads folder.
Users can rename screenshots easily.
Screenshots can be moved to Google Drive.
Images can be shared through email or chat apps.
Unwanted screenshots can be deleted anytime.
Also Read:- How to Change a Tire: A Complete Step-by-Step Guide for Cars, Trucks, Bikes, and Emergencies
Tips for Taking Better Screenshots on Chromebook
Here are a few simple tips that can help you capture better screenshots.
Capture only the important part of the screen.
Use partial screenshots for cleaner images.
Rename screenshots for better organization.
Store important screenshots in Google Drive.
Use annotations to highlight information.
Keep ChromeOS updated for the latest screenshot features.
Also Read:- How to Write a Check: A Complete Step-by-Step Guide
Conclusion
Learning how to take a screenshot on Chromebook is very simple once you understand the keyboard shortcuts and built-in screen capture tools.
The most common shortcut is Ctrl + Show Windows, which captures the entire screen instantly. You can also use Ctrl + Shift + Show Windows to capture a selected portion of the screen.
Whether you use a Chromebook from Acer, Lenovo, HP, Asus, or Samsung, the screenshot methods remain the same because all devices run ChromeOS.
Once you practice these shortcuts a few times, taking screenshots will become quick and effortless.
FAQs
How do you take a screenshot on a Chromebook quickly?
Press Ctrl + Show Windows to capture the full screen.
How do you take a partial screenshot on Chromebook?
Press Ctrl + Shift + Show Windows, then drag the cursor to select the area.
Where are Chromebook screenshots saved?
Screenshots are saved automatically in the Downloads folder.
Can I record my screen on Chromebook?
Yes, the ChromeOS screen capture tool also supports screen recording.
For More UpdateS Visit: Accurate Unit Convert


Leave a Reply